Landing pages on a website is where the marketing magic happens. You’ve done a great job of using your gleaming call-to-action button to get them to this point. Now is the time to ‘wrap it up’ and ensure they convert from anonymous website visitors to known, traceable leads in your sales funnel.
But before you can get them to your landing page, you have to create it! Here’s a step-by-step guide on how to do that using HubSpot marketing software.
You’ll need to be logged into your HubSpot account before following these easy steps to creating a landing page. So go on, sign in and we’ll get going.
9 Steps to Create a Landing Page in HubSpot
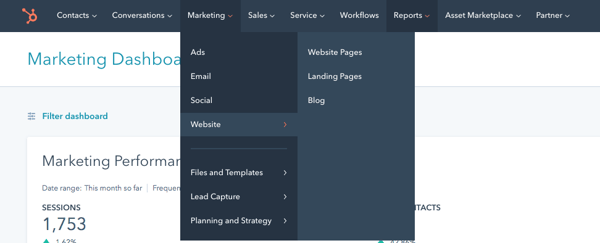
1. Navigate to the Marketing Tab
Under the Marketing Tab you’ll find Website then Landing Pages. Click on this link to take you to the Landing Pages manager.
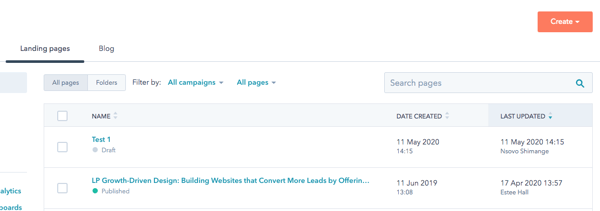
2. Create a New Landing Page
On the right hand side of the page, you’ll see an orange ‘Create’ button. Click on that to take you to the next step.
3. Choose Your Template
At this point you’ll select a template to use as the structure for your landing page. You can select one of your existing templates, buy a premium template through the HubSpot marketplace or create a new template layout.
Select your desired template and then give your new landing page a name. Be descriptive enough so that other users in your HubSpot account will be able to find it easily and know exactly which offer it relates to. Click on ‘Create’ to start working on your page content.
4. Fill in Your Landing Page Content
There’s quite a bit to consider for this step, so I’ll tackle each element separately.

The Page Title: Bearing in mind that your page title is a key SEO element and will appear as the heading of your search engine listing, you’ll want to makes sure that it is clear and compelling, describing exactly what is on offer – in 70 characters or less!
The Page URL: In HubSpot this will be automatically generated based on your page title (as you type). If however, you would like to change the URL for any reason you are able to edit it directly in the pane. Just remember to keep your primary keywords in there for SEO benefit.
The Body Content: Each template will have different content areas for you to edit. As you enter your text, images or HTML the preview pane will update. This will help you determine what the page layout and formatting will look like when you publish. There are a few recommended best practices when it comes to content on your landing page:
- Use a clear title, description, and layout to convey the value of your offer that will urge your visitors to take up your offer.
- Bullet points work very well to highlight the various aspects of your offer.
- Include social sharing links to encourage your visitors to spread the word about your offer.
Remember to include an illustrative, optimised image that represents your offer. We find that an image of a physical book cover for an eBook offer works quite well as it portrays the ‘tangible’ item.
We have a post that outlines the essential elements of a killer landing page, if you want to make sure you are ticking all the boxes for maximum conversion.
5. Insert Your Landing Page Form
In order to collect the contact details of your leads, you’ll need to include a form on your landing page. There are 4 elements to consider in this pane:
- Title: You’ll need to give your form a title.
- Form: Select from an existing form template or create a new one.
- Form Actions: Choose whether you want to redirect people to another page once they have completed the form or simply show an inline message on the landing page.
- Submission Notifications: Choose an email address where submission notifications can be sent.
- Post Submit Emails: You can select to either add your new lead to a workflow or send a basic follow-up email. You don’t have to do either, but it is a nice way to kick off the communication.
- CRM Integration: If you have your CRM integrated with HubSpot, here is where you will be able to link your landing page to the specified campaign in your CRM.

6. Adjust Your Landing Page Options
The landing page options tabs gives you the opportunity to assign your landing page to an existing campaign or add a new one.
Here you’ll also complete your meta description for your page. Remember that this is the description that appears in search engine listings below your page title. While it doesn’t hold much SEO weight, you’ll want to make it as compelling as possible to entice the viewer to click through to your landing page.
There are also fields to adjust your logo and other technical settings in this pane. Use the password protect option to lock down content for exclusive use by specific visitors, leads, customers or partners. (You’ll obviously have to give them the password to enter in order to access the content on such a page.)
7. Tweak Your Style
The style tab let’s you adjust the styling elements for the various components of your landing page such as the font, spacing, background and border features.
8. Create A/B Test
Clicking the ‘Create A/B Test’ button will open a new window – of the same landing page – where you are able to change out certain copy, images or any other content element to test performance against the original version.
9. Set Publishing Details
HubSpot gives you the option to publish immediately or to schedule publishing for a future date and time. This is handy if you are working on a landing page that is part of a campaign that still requires other elements to be completed before going live.
Fantastic job! If you've followed the steps you have your rocking HubSpot landing page up and running. Now it's time to promote the heck out of your offer to get some awesome quality leads!